
Choosing the best angle to sharpen a kitchen knife is crucial for achieving a sharp, long-lasting edge. This guide explores the common angles, how they affect performance, and provides a step-by-step process to find and maintain the ideal angle for your knives. Mastering this technique will significantly improve your cooking experience.
## What Is the Best Angle to Sharpen a Kitchen Knife?
Welcome to the ultimate guide on achieving that perfect, razor-sharp edge on your kitchen knives! A dull knife isn’t just frustrating; it’s also dangerous. When a knife isn’t sharp, you have to apply more pressure, increasing the chance of it slipping. Learning the best angle to sharpen your kitchen knife is the secret to unlocking its full potential and making your time in the kitchen safer and more enjoyable.
In this guide, we’ll break down everything you need to know. We’ll explore why angle matters, common angles for different knife types, and how to find and maintain the ideal angle for your specific knives. Get ready to transform your dull blades into precision cutting tools!
### Why Does the Sharpening Angle Matter So Much?
Think of your knife’s edge like a tiny wedge. The angle of this wedge dictates how sharp it can get and how long it will stay sharp.
* **A finer angle (smaller degree):** Creates a very sharp, delicate edge. This is great for precise tasks like slicing fish or vegetables where you want minimal resistance. However, this fine edge can be more prone to chipping or dulling quickly with heavy use.
* **A wider angle (larger degree):** Creates a more robust, durable edge. This angle is better for knives that will be used for tougher tasks, like chopping through bones or dense ingredients. The edge will last longer, but it might not feel quite as slicing-sharp as a finer angle.
Choosing the right angle is a balancing act between sharpness and durability, tailored to your knife and how you use it.
### Understanding Common Knife Angles
Not all knives are created equal, and neither are their ideal sharpening angles. Here’s a general breakdown:
#### Western-Style Knives
These are the knives you’ll most commonly find in a typical kitchen, often part of a [best knife set for kitchen]. They are generally designed for versatility and durability.
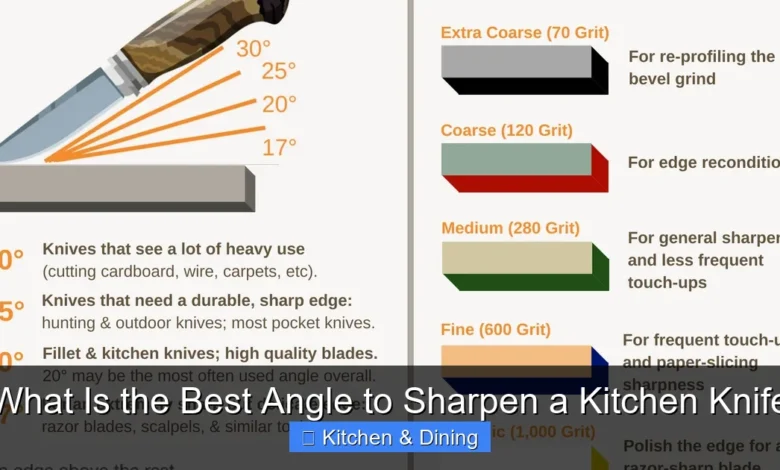
* **Angle:** Typically 20 degrees per side.
* **Characteristics:** This angle offers a good balance between sharpness and edge retention. It’s forgiving for everyday tasks and can handle chopping, slicing, and dicing with ease. Many [best American made kitchen knife set] knives fall into this category.
#### Japanese-Style Knives
Known for their exceptional sharpness and precision, Japanese knives often have a more acute angle. This is particularly true for knives within a [best Japanese kitchen knife set].
* **Angle:** Typically 10-15 degrees per side.
* **Characteristics:** These knives are designed for ultimate sharpness, allowing for incredibly clean cuts. They excel at delicate tasks like filleting fish (see our guide on the [best Japanese knife for filleting fish]) or thinly slicing vegetables. However, the finer edge requires more care and is less forgiving of aggressive use.
#### Hybrid Knives
Some modern knives blend the characteristics of both Western and Japanese styles.
* **Angle:** Often around 15 degrees per side.
* **Characteristics:** These knives aim to provide a good balance of sharpness and durability, making them a great all-around option.
### How to Determine the Best Angle for Your Knife
So, how do you figure out the right angle for *your* specific knives?
#### 1. Check the Manufacturer’s Specifications
The best place to start is by checking the packaging or the manufacturer’s website for your knife. They will often recommend the ideal sharpening angle. Some knives even have the angle etched discreetly onto the blade itself, usually near the bolster.
#### 2. Consider the Knife Type and Intended Use
* **Chef’s Knife/Santoku:** For general-purpose use, 15-20 degrees is a good starting point. A 20-degree angle will offer more durability for chopping, while a 15-degree angle will provide superior slicing ability.
* **Paring Knife:** Often used for detailed work, a finer angle of 15 degrees can be beneficial for precision. Check out our guide on the [best paring knife] for more on specific types.
* **Slicing/Carving Knives:** For smooth, clean slices of meat or bread, a finer angle (15 degrees) is often preferred. For a dedicated [best turkey carving knife] or [best brisket carving knife], precision is key.
* **Boning Knives:** These knives require a sharp, but also durable, edge to navigate joints and bones. An angle around 17-20 degrees is often suitable. If you’re looking for the [best boning knife for chicken], consider the balance of sharpness and strength.
* **Utility Knives:** These versatile knives can benefit from an angle around 15-20 degrees, depending on their primary use. A good [best utility kitchen knife] should be adaptable.
#### 3. Look for Visual Cues
When using a sharpening stone, you can often get a feel for the angle by observing how the bevel of the blade rests on the stone. Ideally, you want to see a consistent contact along the entire edge you are sharpening.
#### 4. Use an Angle Guide
For those who are new to sharpening or want to ensure absolute consistency, angle guides are invaluable. These small clips attach to the back of your knife and rest on the sharpening stone, helping you maintain a specific angle. Many electric sharpeners also come with built-in angle guides. If you’re considering an electric option, our guide on the [best electric knife sharpener for kitchen knives] can help.
### Step-by-Step Guide to Sharpening with the Correct Angle
Whether you’re using a whetstone, a pull-through sharpener, or a guided system, consistency is key. Here’s a general process, focusing on maintaining the correct angle.
#### Method 1: Using a Sharpening Stone (Whetstone)
This is the traditional and most rewarding method, offering the most control.
##### Step 1: Prepare Your Workspace
* Ensure your sharpening stone is soaked (if it’s a water stone) or lubricated (if it’s an oil stone) according to the manufacturer’s instructions.
* Place the stone on a stable, non-slip surface. A damp cloth or a dedicated stone holder works well.
##### Step 2: Find the Correct Angle
* **For a 20-degree angle:** Imagine a line from the spine of the knife to the edge. A 20-degree angle is roughly the angle formed by placing two nickels stacked on top of each other next to the edge, or the angle of a standard door frame.
* **For a 15-degree angle:** This is a finer angle, roughly the angle of a standard pencil.
If you’re unsure, start with a slightly wider angle and adjust if you feel the knife isn’t sharp enough for your needs. An angle guide attached to the knife can be extremely helpful here.
##### Step 3: Position the Knife on the Stone
* Place the heel (the part of the blade closest to the handle) of your knife on the stone at your chosen angle.
* Apply light, consistent pressure.
##### Step 4: Sharpen One Side
* Draw the knife blade across the stone from heel to tip, maintaining the angle. Imagine you are trying to shave a thin layer off the stone.
* Repeat this motion, moving the blade along the stone until you have created a slight “burr” on the opposite side of the edge. A burr is a tiny, raised ridge of metal that indicates you’ve reached the apex of the edge. You can feel for it by gently running your fingertip *away* from the edge on the opposite side.
##### Step 5: Sharpen the Other Side
* Flip the knife over and repeat Step 4 on the other side of the blade. Maintain the exact same angle.
* Continue sharpening until you feel a burr form on the first side.
##### Step 6: Refine the Edge
* Once you’ve established a burr on both sides, reduce the pressure significantly.
* Alternate between sides, making fewer strokes on each side (e.g., 5 strokes per side, then 3, then 1). This refines the edge and removes the burr.
##### Step 7: Hone and Test
* After sharpening, use a honing steel to realign the microscopic edge. This is crucial for maintaining sharpness between sharpenings.
* Test the sharpness by carefully trying to slice a piece of paper. It should slice cleanly without tearing.
#### Method 2: Using a Pull-Through Sharpener
These are convenient and often have pre-set angles.
* **Step 1: Identify the Slots:** Most pull-through sharpeners have multiple slots, often labeled for coarse (for repairing damage) and fine (for honing). Look for slots marked with an angle (e.g., 15° or 20°).
* **Step 2: Follow Instructions:** Always read the manufacturer’s instructions for your specific sharpener.
* **Step 3: Pull Gently:** Insert the heel of the blade into the designated slot and pull the knife towards you with light, consistent pressure. Do not saw back and forth.
* **Step 4: Repeat:** Repeat the pull several times until the knife feels sharp.
* **Step 5: Hone:** Many pull-through sharpeners have a ceramic honing slot. Use this after sharpening to refine the edge.
#### Method 3: Using a Guided Sharpening System
These systems use a clamping mechanism to hold the knife at a fixed angle, with guide rods to maintain the angle on stones or other abrasives.
* **Step 1: Set the Angle:** Most systems allow you to adjust or select the desired angle.
* **Step 2: Clamp the Knife:** Securely clamp your knife in the system.
* **Step 3: Sharpen:** Move the abrasive (stone, diamond rod) back and forth along the blade, ensuring it maintains contact with the guide.
* **Step 4: Flip and Repeat:** Flip the knife and repeat the process on the other side.
### Maintaining Your Knife’s Sharpness
Sharpening is only part of the equation. To keep your knife performing at its best, you need to maintain it.
#### Honing Regularly
* **What is Honing?** Honing doesn’t actually remove metal. Instead, it uses a steel rod to realign the microscopic teeth of the blade’s edge that have bent over.
* **How Often?** It’s best to hone your knife every time you use it, or at least every few uses.
* **The Angle:** Use the same angle you sharpened your knife to (15-20 degrees) when honing. Gently draw the blade along the steel from heel to tip.
#### Proper Storage
* Avoid tossing your knives loosely into a drawer. This can nick and dull the edges.
* Consider a knife block, a magnetic strip (like a [best knife magnetic strip]), or individual sheaths.
#### Proper Cleaning
* Clean your knives immediately after use.
* Wash by hand with warm, soapy water and dry thoroughly. Dishwashers are a knife’s worst enemy, as the harsh detergents and jostling can damage the blade and dull the edge. For a clean kitchen, check out the [best way to clean the inside of a microwave oven].
### Troubleshooting Common Sharpening Issues
* **Knife Still Feels Dull:** You might not be reaching the apex of the edge, or you might be using too wide an angle. Ensure you are creating a burr on the opposite side.
* **Edge Chips Easily:** You might be using an angle that is too fine for the type of knife or the tasks you perform. Try increasing the angle slightly.
* **Inconsistent Angle:** This is the most common issue for beginners. Using an angle guide or a guided sharpening system will help immensely.
* **Too Much Pressure:** Applying too much pressure can actually damage the edge and make it harder to achieve a fine polish. Be gentle and consistent.
### Conclusion
The “best” angle to sharpen a kitchen knife isn’t a single magic number; it’s a carefully chosen degree that balances the needs of your specific blade and your cooking style. For most Western knives, 20 degrees per side is a great starting point, offering durability and sharpness. Japanese knives often shine with a finer 10-15 degree angle for unparalleled precision.
By understanding the principles behind sharpening angles, identifying the ideal angle for your knives, and practicing a consistent sharpening technique, you can transform your cooking experience. A sharp knife makes every task easier, safer, and more enjoyable. So, grab your sharpening stone, find your angle, and get ready to experience the joy of a truly sharp blade!
- Understanding Blade Angles: The angle at which a knife is sharpened determines its sharpness and durability. Different angles are suited for different knife types and tasks.
- Common Sharpening Angles: Most Western-style kitchen knives are best sharpened between 15-20 degrees per side, while Japanese knives often benefit from a finer angle of 10-15 degrees.
- Identifying Your Knife’s Angle: Many knives have their intended angle marked on the blade. If not, using an angle guide or a simple, consistent technique is key.
- Factors Influencing Angle Choice: Consider the knife’s material, intended use (delicate slicing vs. heavy chopping), and your personal preference for sharpness versus edge retention.
- Achieving Consistent Angles: Using a sharpening stone, a guided sharpening system, or an electric sharpener with angle guides helps maintain a consistent angle throughout the sharpening process.
- The Importance of Honing: Regularly honing your knife with a honing steel realigns the microscopic edge without removing metal, preserving the sharpness achieved through sharpening.


