
Tired of dull knives? This guide will teach you how to use a whetstone to restore your kitchen knives to their former glory. We’ll walk you through selecting the right whetstone, preparing it, and mastering the sharpening angles for a truly sharp edge. You’ll be slicing and dicing with ease in no time, making your cooking experience safer and more enjoyable.
## How to Use a Whetstone to Sharpen a Kitchen Knife
A sharp kitchen knife is more than just a convenience; it’s a safety essential. Dull knives require more force, increasing the risk of slips and accidental cuts. Fortunately, you don’t need expensive electric sharpeners or professional services to keep your blades in top condition. Learning to use a whetstone is a rewarding skill that will transform your kitchen experience. This comprehensive guide will walk you through every step, from choosing the right whetstone to achieving a razor-sharp edge on your favorite kitchen knives.
### Why Use a Whetstone?
Whetstones, also known as sharpening stones or grindstones, have been used for centuries to sharpen tools and knives. They offer unparalleled control over the sharpening process, allowing you to tailor the edge to your specific needs. Unlike many electric sharpeners that can overheat and damage the knife’s temper, or simple pull-through sharpeners that can remove too much metal, whetstones work with precision. They are versatile, capable of repairing minor chips, restoring a dull edge, and creating a truly fine, polished cutting surface. Whether you own a collection of kitchen knives or just a few favorites, mastering the whetstone will extend their life and enhance their performance. If you’re looking to invest in a new set of knives, exploring options like the best knife set for kitchen can also be a great starting point.
### What You’ll Need
Before you begin, gather your supplies:
* Whetstone(s): A combination stone with different grit levels is ideal for beginners.
* Water: For lubricating the stone (if using a water stone).
* Towel or Non-Slip Mat: To stabilize the whetstone.
* Blade Oil (Optional): For rust prevention on certain types of knives.
* Rag or Paper Towels: For wiping the blade and cleaning up.
* A Stable Surface: A clean countertop or workbench.
### Understanding Whetstone Grit
Whetstones come in various grit sizes, measured in P.P.M. (Particles Per Million) or simply by a number. A lower grit number indicates a coarser stone, while a higher grit number signifies a finer stone.
* Coarse Grit (e.g., 200-600): Used for repairing significant damage, like chips or nicks, and for establishing a new bevel on very dull knives.
* Medium Grit (e.g., 800-1500): The workhorse for most sharpening. It removes the scratches from the coarse stone and refines the edge.
* Fine Grit (e.g., 3000-6000): Used for polishing the edge, creating a much sharper and smoother cutting surface.
* Extra-Fine Grit (e.g., 8000+): For advanced users seeking a mirror polish and the absolute keenest edge.
For most home cooks, a combination stone with a medium (around 1000) and fine (around 4000 or 6000) grit is perfect. These stones can handle most sharpening needs.
### Preparing Your Whetstone
The preparation step depends on the type of whetstone you have.
#### Soaking Water Stones
Most common whetstones are water stones. They require soaking in water before use.
1. Submerge the Stone: Place your whetstone in a container of cool water.
2. Wait for Bubbles to Stop: The stone will initially release air bubbles. Let it soak until the bubbling stops completely. This can take 5-20 minutes, depending on the stone. A fully saturated stone will feel heavier and sink to the bottom.
3. Keep it Wet: Once soaked, keep the surface of the stone wet with water throughout the sharpening process. You can splash water on it as needed.
#### Oil Stones
Some sharpening stones are designed to be used with oil. These typically require a light application of honing oil to the surface before use. Always follow the manufacturer’s instructions for your specific stone.
### Finding the Right Angle
This is arguably the most crucial part of sharpening. Most Western-style kitchen knives have an edge angle of 20 degrees per side. Japanese knives often have a sharper angle, around 15 degrees. If you’re unsure, start with 20 degrees.
* The “Matchbook” Method: A common trick is to visualize the angle. Place two matchbooks flat on the stone. The thickness of the matchbooks represents approximately 20 degrees.
* Angle Guides: You can purchase inexpensive angle guides that clip onto the spine of your knife to help you maintain consistency.
* Practice Makes Perfect: Don’t worry if you don’t get it perfect the first time. The key is consistency.
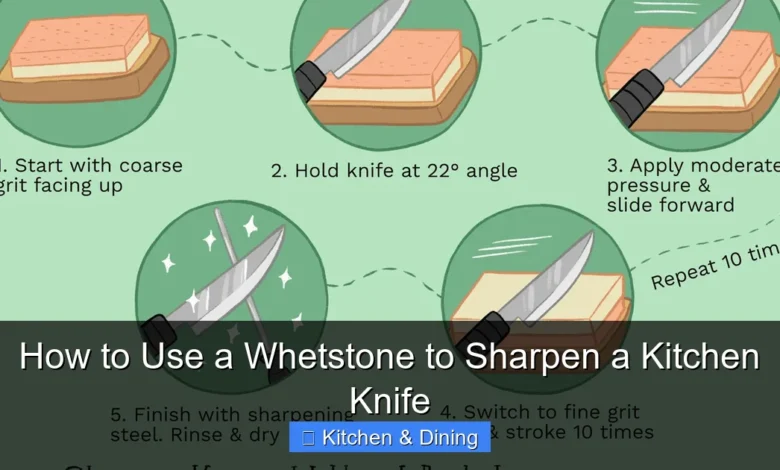
### Step-by-Step Sharpening Process
Now, let’s get sharpening!
#### Step 1: Secure the Whetstone
Stability is paramount for safe and effective sharpening.
1. Use a Non-Slip Surface: Place your soaked (or oiled) whetstone on a damp towel or a rubber mat on your stable work surface. This prevents the stone from sliding around.
2. Ensure Even Contact: Make sure the entire stone is resting flat on the surface.
#### Step 2: Start with the Coarser Grit (If Applicable)
If your knife has significant damage or is extremely dull, begin with the coarser grit side of your combination stone. If your knife is only slightly dull and has no chips, you might be able to start with the medium grit.
1. Position the Knife: Hold the knife handle firmly with one hand. With the other hand, place the heel (the part of the blade closest to the handle) of the blade on the coarse grit stone.
2. Set the Angle: Lift the spine of the knife until you achieve your target angle (e.g., 20 degrees). Ensure the edge of the blade is making contact with the stone.
3. Sharpen in Strokes:
* Heel to Tip: Apply moderate, even pressure. Push the blade forward across the stone, moving from the heel towards the tip in a smooth, sweeping motion. Imagine you’re trying to slice off a thin layer of the stone.
* Return Stroke: As you pull the blade back, lift it slightly off the stone or maintain very light pressure. The goal is to abrade the steel on the forward stroke.
* Repeat: Continue this motion, ensuring you cover the entire length of the blade. Aim for about 10-15 strokes on one side.
#### Step 3: Develop a Burr
As you sharpen one side, a tiny, wire-like edge called a “burr” will form on the opposite side of the blade. You can feel for this burr by gently (and carefully!) running your fingertip from the spine of the blade down towards the edge on the side *opposite* of the one you’re sharpening. You should feel a slight roughness or “catch.”
1. Check for Burr: Periodically check for the burr along the entire length of the edge. If you don’t feel it everywhere, continue sharpening that side until it forms.
2. Focus on the Burr: Once you feel a burr along the entire length of the edge, it’s time to switch sides.
#### Step 4: Sharpen the Other Side
Now, flip the knife over and repeat the sharpening process on the other side of the blade.
1. Maintain the Angle: Crucially, maintain the same angle you used on the first side.
2. Sharpen Until Burr Forms: Continue sharpening until you feel a burr forming on the *first* side you sharpened. You may need slightly fewer strokes on this side compared to the first.
3. Alternate Sides (Optional but Recommended): For a more refined edge, you can alternate sides with fewer strokes (e.g., 5 strokes on side A, 5 on side B, then 3 on A, 3 on B, etc.) as you progress. This helps ensure symmetry.
#### Step 5: Move to the Finer Grit
Once you’ve established a burr on both sides using the coarser grit, it’s time to refine the edge with the finer grit.
1. Flip the Stone: Turn your combination stone over to the finer grit side.
2. Repeat the Process: Follow the exact same sharpening procedure (Step 2, 3, and 4) on the finer grit. Use lighter pressure than you did on the coarse grit. The goal here is to remove the deeper scratches left by the coarser stone and create a smoother, sharper edge.
3. Focus on Burr Removal: Continue until you feel a fine burr on both sides.
#### Step 6: Deburr the Edge
The burr needs to be removed for a clean cutting edge.
1. Light Strokes: Use the finest grit stone you have. With very light pressure, take a few strokes on each side of the blade, alternating sides with each stroke.
2. Reduce Pressure: Gradually reduce the pressure with each subsequent stroke. You are essentially breaking off and smoothing out the burr.
3. Edge Trailing Strokes: For the very last few strokes, use an “edge trailing” motion – meaning the spine of the knife leads and the edge trails behind it on the stone. This further helps to remove any remaining burr.
#### Step 7: Stropping (Optional, for Ultimate Sharpness)
Stropping is the final step that polishes the edge to an incredible sharpness. You can use a leather strop, a piece of cardboard with a polishing compound, or even the cardboard packaging that some knives come in.
1. Load the Strop (If Necessary): If using a leather strop with compound, apply a small amount of polishing compound.
2. Maintain the Angle: Hold the knife at the same sharpening angle.
3. Strop Both Sides: Place the blade on the strop with the spine slightly elevated. Pull the blade towards you (edge trailing) across the strop, again alternating sides with each pass. Use very light pressure.
4. Continue Until Smooth: strop until the blade feels smooth and hair-shaving sharp. You can test this carefully by trying to shave a single strand of hair from your arm or the back of your hand.
#### Step 8: Clean Up
1. Wash the Knife: Thoroughly wash your knife with soap and warm water to remove any metal particles and residue.
2. Dry Immediately: Dry the knife completely with a clean towel to prevent rust, especially if it’s a high-carbon steel knife.
3. Clean the Stone: Rinse your whetstone under running water to remove any metal filings. Let it air dry completely before storing it. If it’s a water stone, you can flatten it periodically with a flattening stone to keep its surface even.
### Practical Tips for Success
* Consistency is Key: The angle is more important than the exact grit progression. If you can maintain a consistent angle, you’ll get good results.
* Light Pressure on Fine Grits: Use much lighter pressure on finer grits to avoid damaging the delicate edge.
* Listen to Your Knife: Pay attention to how the blade feels against the stone. You’ll learn to recognize when you’re making progress.
* Start with Less Expensive Knives: If you’re new to whetstone sharpening, practice on an older or less valuable knife before tackling your prized chef’s knife.
* Know Your Steel: Different steel types can behave differently. High-carbon steels tend to sharpen more easily but may rust more readily. Stainless steels are often harder to sharpen but more corrosion-resistant.
* Consider a Whetstone Holder: These can provide extra stability and elevate the stone for more comfortable sharpening.
* Don’t Over-Sharpen: Sharpening removes metal. Only sharpen when necessary. For daily maintenance, a honing steel or a ceramic rod is often sufficient to realign the edge. You can find excellent options when looking for the best electric knife sharpener for kitchen knives, though whetstones offer a different level of control.
### Troubleshooting Common Issues
* Knife Still Not Sharp:
* Angle was inconsistent: Re-evaluate your angle and try again.
* Insufficient sharpening: You may need more strokes on each grit, or you haven’t developed a proper burr.
* Edge is rounded: You might need to use a coarser grit to reprofile the edge.
* Burr not removed: Spend more time deburring and stropping.
* Uneven Edge:
* Inconsistent pressure or angle: Focus on maintaining a steady hand.
* Stone is not flat: Flatten your whetstone.
* Rust Forming Quickly:
* Knife not dried properly: Always dry knives immediately and thoroughly.
* High-carbon steel: These knives are more prone to rust. Consider using a light coat of food-grade mineral oil for storage.
### Conclusion
Mastering the art of whetstone sharpening takes practice and patience, but the rewards are immense. A sharp knife makes cooking safer, more efficient, and frankly, more enjoyable. By understanding your whetstone, maintaining a consistent angle, and following these steps, you can keep your kitchen knives performing at their best for years to come. So, embrace the process, and enjoy the satisfying glide of a perfectly sharp blade through your ingredients. For those who prefer a quicker solution or want to supplement their manual sharpening skills, exploring the best electric kitchen knife options can also be a good idea.
Key Takeaways
- Understand Whetstone Grit: Different grit levels on a whetstone are crucial for various sharpening stages, from repairing chips to achieving a polished edge.
- Proper Soaking is Key: Most whetstones, especially water stones, need to be soaked in water until they stop producing air bubbles to ensure optimal lubrication during sharpening.
- Maintain a Consistent Angle: The most critical factor in whetstone sharpening is maintaining a steady angle between the blade and the stone, typically between 15-20 degrees for most kitchen knives.
- Work Both Sides of the Blade: Sharpening requires working both sides of the blade evenly to create a symmetrical and effective cutting edge.
- Deburring is Essential: After sharpening, the burr (a thin, wire-like edge) needs to be removed through a process called deburring to achieve a truly sharp and clean cut.
- Follow Up with Stropping: For the ultimate sharpness, stropping on leather or a similar material polishes the edge and further refines the burr.
- Regular Maintenance Matters: Consistent touch-ups with a fine grit stone or honing steel will keep your knives sharp longer between full sharpening sessions.


