How to Prevent Food from Sticking and Causing Residue
Frustrated by stuck-on food and stubborn residue? This comprehensive guide will equip you with the knowledge to prevent food from sticking to your cookware. You’ll learn essential techniques for preparing your pans, choosing the right heat, and managing your cooking process. Achieve easier cleanup and enjoy perfectly cooked meals every time by mastering these simple yet effective methods.
Are you tired of battling stubborn, burnt-on food residue after cooking? Does the thought of scrubbing your pans fill you with dread? You’re not alone! Food sticking to cookware is a common kitchen frustration. It not only makes cleaning a chore but can also ruin the texture and appearance of your dishes. The good news is that preventing food from sticking and causing residue is entirely achievable with the right knowledge and techniques.
This guide will walk you through everything you need to know to say goodbye to stuck-on messes. We’ll cover essential preparation steps, heat control strategies, the crucial role of fats, and how to choose the best cookware for your needs. By the end of this guide, you’ll have the confidence to cook a wide variety of foods without the worry of them adhering to your pans.
## Understanding Why Food Sticks
Before we dive into prevention methods, let’s briefly understand why food sticks in the first place. Several factors contribute to this common problem:
* Protein Denaturation: When food, especially meat and eggs, heats up, proteins change their structure. These proteins can bond with the metal surface of the pan.
* Moisture Evaporation: As moisture from food evaporates, the remaining solids can get concentrated and adhere to the pan.
* Uneven Heat Distribution: Hot spots on your pan can cause food to cook unevenly and burn in those areas, leading to sticking.
* Pan Surface Irregularities: Even seemingly smooth pans have microscopic pores and imperfections where food can lodge.
* Lack of Lubrication: Without a barrier, food particles have direct contact with the pan, making bonding easier.
Now, let’s explore how to combat these issues.
## Preparing Your Pan: The Foundation of Non-Stick Cooking
The most critical step in preventing food from sticking happens *before* you even put food in the pan. Proper pan preparation is key.
### Preheating Your Pan
This is arguably the most important step. Putting cold food into a cold pan, or even a warm pan, is a recipe for sticking.
Why Preheat?
- Thermal Expansion: When a pan heats up, the metal expands slightly. This can fill in some of the microscopic pores on the surface, creating a smoother cooking surface.
- Creating a “Barrier”: A properly preheated pan helps the fat you add to spread evenly and create a protective layer.
- Even Cooking: Preheating ensures that your food begins to cook immediately and evenly, reducing the chances of hot spots causing sticking.
How to Preheat:
Place your empty pan on the stovetop over medium heat for about 1 to 3 minutes. The exact time will vary depending on the type of pan and the heat setting. You can test if it’s ready by flicking a few drops of water into the pan. If the water sizzles and evaporates quickly, it’s hot enough. If it just sits there, it needs more time. If the water balls up and dances around before disappearing, it’s likely too hot.
Important Note: Avoid overheating, especially with non-stick pans, as this can damage their coating.
### Adding the Right Fat
Once your pan is preheated, it’s time to add your cooking fat. This fat acts as a lubricant and a barrier between the food and the hot metal.
Choosing Your Fat:
- Oils: Vegetable oil, canola oil, grapeseed oil, or avocado oil are good all-purpose choices. They have a relatively high smoke point.
- Butter: Butter adds great flavor but has a lower smoke point and can burn easily. It’s best used for lower-heat cooking or combined with a higher-smoke-point oil. Clarified butter (ghee) has a higher smoke point and is a better option for higher heat.
- Animal Fats: Lard or bacon fat can add wonderful flavor and are excellent for preventing sticking, especially for meats.
How Much Fat?
You need enough fat to coat the bottom of the pan thinly. For most cooking, about 1-2 tablespoons is sufficient. You should see the fat shimmer slightly when it’s hot, but not smoke. If the fat starts smoking, it’s too hot and needs to be removed and the pan cooled slightly before adding more.
Ensuring Even Distribution: Gently swirl the pan to distribute the fat evenly. If using butter, let it melt and foam, then swirl. The fat should create a slick surface.
## Mastering Heat Control
Temperature is your best friend (or worst enemy) when it comes to preventing sticking. Too low, and food will steam and absorb moisture, making it stick. Too high, and it will burn and form a stubborn residue.
### Finding the Medium: The “Shimmer” Test
Medium Heat is Often Best: For many types of cooking, medium heat is the sweet spot. It’s hot enough to cook food effectively without burning it immediately.
The Shimmer: A properly heated oil will appear fluid and might develop a slight “shimmer” or “wavy” appearance. It should not be smoking. If it’s smoking, turn the heat down. If it’s just sitting there like cold oil, it needs to heat up more.
### Understanding Different Cookware Needs
Different pan materials conduct heat differently and require slightly varied approaches.
* Stainless Steel: These pans are durable and versatile but can be prone to sticking if not preheated and oiled properly. Learning to control the heat is especially important here.
* Cast Iron: When properly seasoned, cast iron can become incredibly non-stick. However, it requires careful preheating and consistent oiling.
* Non-Stick (Coated) Pans: These are designed for non-stick cooking, but their coatings can be damaged by excessive heat or abrasive cleaning. Always follow the manufacturer’s guidelines.
* Carbon Steel: Similar to cast iron, carbon steel pans develop a natural non-stick surface with use and proper seasoning.
### Adjusting Heat During Cooking
Don’t set it and forget it! Monitor your food and adjust the heat as needed. If you see food browning too quickly, reduce the heat. If it’s not searing or cooking, you might need to increase it slightly.
## The Crucial Role of Fats and Oils
We’ve touched on using fat, but let’s delve deeper into its importance for preventing food from sticking.
### Creating a Slippery Surface
The primary role of fat is to create a slippery barrier. Imagine tiny ball bearings between your food and the metal. This prevents direct contact and the formation of sticky bonds.
### Choosing the Right Type of Fat for the Job
High Smoke Point Oils: For searing meats or cooking at higher temperatures, opt for oils like avocado, grapeseed, or canola oil. These can withstand higher heat before breaking down and smoking.
Lower Smoke Point Fats: Butter and olive oil are better for lower to medium heat cooking, like sautéing vegetables or making delicate sauces. To get the flavor of butter with a higher smoke point, you can clarify it or combine it with a neutral oil.
### The “Fat Test”
A good indicator that your pan is ready and has enough fat is when the fat is hot and begins to shimmer. If you are frying, you might see tiny bubbles form around the edges. For more delicate items like eggs, you want a thin, even layer of hot fat.
## Don’t Overcrowd the Pan
This is a mistake many home cooks make, and it’s a guaranteed way to end up with stuck-on food.
### Why Overcrowding Causes Sticking
Lowered Pan Temperature: When you add too much food to a pan at once, it drastically lowers the pan’s temperature. This causes the food to steam rather than sear.
Increased Moisture: Steaming releases more moisture, which can then make the food adhere to the pan more easily.
Uneven Cooking: Food pieces in the center of the pile won’t cook as well, leading to uneven browning and increased chances of sticking.
### The Solution: Cook in Batches
It might take a little longer, but cooking in batches is essential for achieving perfect results and avoiding residue. Cook only enough food to fit comfortably in a single layer, allowing for space between each piece. Let the first batch cook and release naturally before adding the next. You can keep the cooked food warm on a plate while you finish the rest.
## Patience and Technique: Letting Food Release Naturally
One of the hardest habits to break is the urge to constantly move or flip food.
### The Science of Searing and Sticking
When you place protein-rich foods like meat or fish into a hot pan, the proteins start to denature and bond with the pan surface. However, as the food cooks, a crust forms, and the moisture content changes. This process eventually allows the food to release naturally from the pan.
### When to Flip or Move
Wait for the Natural Release: The best indicator is to gently try to move the food with a spatula. If it releases easily, it’s ready to be flipped or moved. If it’s resisting, give it a little more time to cook and form that natural release.
For Eggs: For fried eggs, you’ll see the whites set and begin to turn opaque. The edges should start to crisp slightly. A gentle nudge with a spatula should show it’s ready to slide. For scrambled eggs, constant stirring is part of the process, but using a preheated, well-oiled pan is still crucial.
### Deglazing: Capturing Flavor and Avoiding Waste
Even with the best techniques, a little bit of fond (those tasty browned bits) might stick to the pan. Instead of scrubbing furiously, use this opportunity! Deglazing is the process of adding a liquid (like wine, broth, or water) to a hot pan after cooking. The liquid loosens these browned bits, creating a flavorful sauce or base for future dishes. This not only cleans your pan but also adds incredible depth of flavor. It’s a fantastic way to salvage those flavorful remnants and is key to many delicious sauces and gravies.
## Knowing Your Cookware: Choosing the Right Tools
While technique is paramount, the cookware you use plays a significant role in how easily food sticks.
### Non-Stick Pans: The Obvious Choice for Many
For everyday cooking, especially for delicate items like eggs, pancakes, or fish, non-stick pans are a great investment. They are designed to minimize sticking. However, remember that their coatings can be damaged:
- Avoid Metal Utensils: Always use wooden, silicone, or plastic utensils.
- Don’t Use High Heat: Stick to medium or medium-low heat settings.
- Hand Wash: Most non-stick pans are not dishwasher safe, as the harsh detergents can degrade the coating.
### Cast Iron and Carbon Steel: The Seasoned Pros
These heavy-duty pans, when properly seasoned and maintained, can achieve a remarkably non-stick surface. Seasoning involves baking layers of oil into the metal, creating a natural, durable coating.
- Consistent Oiling: Always ensure a thin layer of oil is present during cooking.
- Proper Cleaning: Avoid soap whenever possible. Scrape out food remnants with a stiff brush or scraper, and then dry thoroughly and apply a very thin layer of oil before storing.
If you’re looking for a reliable cast iron skillet, exploring options for the best outdoor grills and smokers might also lead you to some excellent cast iron cooking surfaces, or consider checking out some of the best bargain food processors for complementary kitchen tools.
### Stainless Steel: Master the Technique
Stainless steel is fantastic for developing a great sear and is very durable. However, it requires the most attention to heat and oil. Mastering the preheating and oiling techniques described earlier is absolutely essential for cooking with stainless steel without sticking.
## Troubleshooting Common Sticking Issues
Even with the best efforts, sometimes food sticks. Here’s how to deal with it:
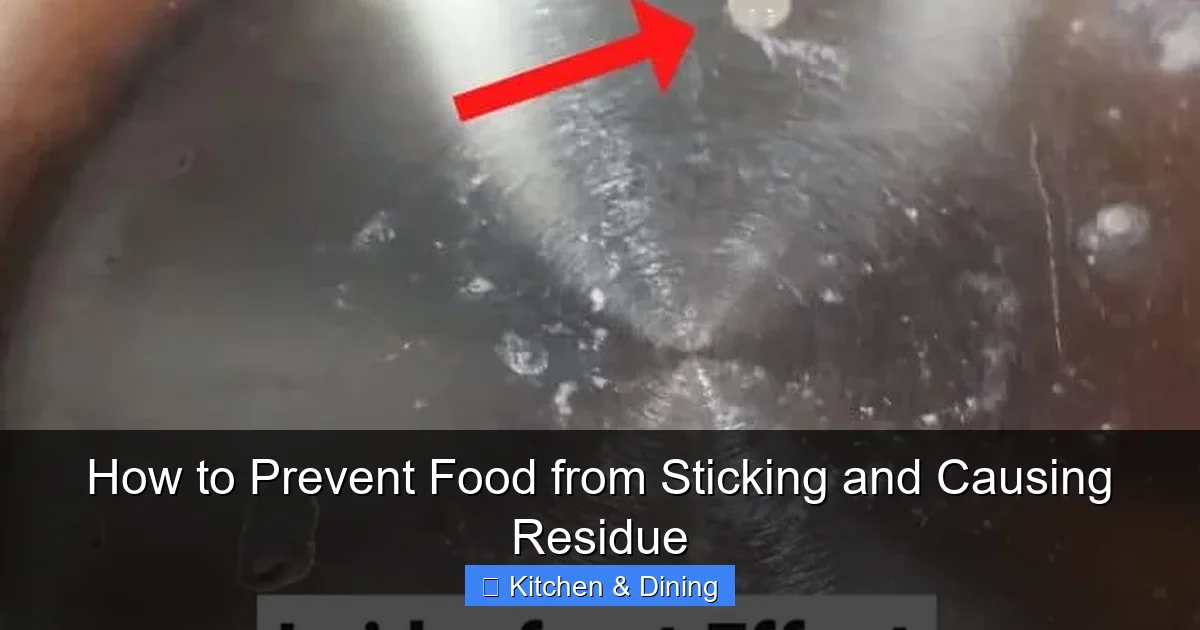
### Stubbornly Stuck Food
The Simmer Method: If food is really stuck, don’t force it. Add a small amount of water or broth to the pan, bring it to a simmer on low heat, and let it sit for a few minutes. This will often loosen the stuck-on bits. You can then scrape them up with a wooden spoon or spatula.
Baking Soda Paste: For really tough, burnt-on residue (especially on stainless steel), make a paste of baking soda and water. Apply it to the stubborn spots, let it sit for 15-30 minutes, then scrub with a non-abrasive sponge.
### Sticking During Initial Cooking
Too Cold: If food is sticking right from the start, your pan was likely not hot enough. Increase the heat slightly and ensure you have adequate fat.
Too Hot: If food is burning and sticking instantly, your pan is too hot. Turn down the heat and try to scrape away the burnt bits.
### Residue on Non-Stick Pans
If your non-stick pan is starting to show residue that’s hard to remove, it might be a sign of overheating or using the wrong cleaning methods. Try a gentle wash with warm, soapy water and a soft sponge. For more stubborn issues, some manufacturers suggest boiling water with a few tablespoons of baking soda in the pan for a few minutes, then cooling and washing gently.
## Conclusion: Enjoying a Sticking-Free Kitchen
Preventing food from sticking and causing residue isn’t magic; it’s a combination of understanding your tools, mastering a few key techniques, and a little bit of patience. By focusing on proper pan preparation, precise heat control, the judicious use of fats, and avoiding the temptation to overcrowd your pan, you’ll transform your cooking experience.
Embracing techniques like deglazing will not only make cleanup easier but also enhance the flavor of your meals. Remember that different cookware materials have their own unique needs, so take the time to learn what works best for your favorite pots and pans.
With these strategies in hand, you can look forward to more enjoyable cooking sessions and significantly less time spent scrubbing. Say goodbye to frustration and hello to perfectly cooked, residue-free meals every time!
- Proper Pan Preparation is Crucial: Preheating your pan and applying the correct amount of fat are fundamental steps to creating a non-stick surface.
- Heat Management is Key: Understanding and controlling the cooking temperature prevents food from burning and adhering to the pan.
- The Role of Fat: Using the right type and amount of oil or butter creates a barrier between food and the pan surface.
- Don’t Overcrowd the Pan: Allowing adequate space for food ensures even cooking and reduces the likelihood of sticking.
- Know Your Cookware: Different materials require different approaches to non-stick cooking.
- Patience Pays Off: Resisting the urge to move food too soon allows a natural sear and release.