How to Convert Oven to Air Fryer Without Oil
Unleash the power of your existing oven to achieve air-fried deliciousness without a drop of oil. This guide reveals how to simulate air frying with simple oven hacks, focusing on convection settings, proper rack placement, and strategic temperature control. You’ll learn to make your favorite foods super crispy and healthier using just your oven.
# How to Convert Oven to Air Fryer Without Oil
Love the crispy, golden perfection of air-fried foods but don’t have a dedicated air fryer? You’re in luck! Many of us dream of those perfectly crunchy fries, tender chicken wings, and beautifully roasted vegetables that air fryers deliver so effortlessly. But what if you could achieve similar results using the appliance you already have – your oven? The good news is, you absolutely can! This comprehensive guide will walk you through how to convert your oven into an air fryer without a single drop of oil, making your meals healthier and your kitchen more versatile.
We’ll explore the principles behind air frying and how to replicate them in your standard oven. You’ll learn about the magic of convection settings, the importance of airflow, and how to adjust your cooking techniques for maximum crispiness. Get ready to unlock a new level of deliciousness from your own kitchen!
## Understanding the Air Frying Principle
Before we dive into the “how-to,” let’s quickly understand what makes an air fryer so effective. An air fryer is essentially a small, powerful convection oven. It works by circulating superheated air at high speeds around your food. This rapid circulation creates a crispy, browned exterior by mimicking the effect of deep frying, but with significantly less (or in our case, no) oil. The key components are:
* High Heat: Air fryers typically operate at high temperatures.
* Rapid Air Circulation: This is the most crucial element. Powerful fans create a vortex of hot air that cooks food evenly and quickly.
* Compact Design: The smaller interior of an air fryer helps concentrate the hot air, making the circulation even more effective.
Our goal when converting an oven is to replicate these elements as closely as possible.
## Leveraging Your Oven’s Convection Setting
If your oven has a convection setting, you’re already halfway there! A convection oven has a fan that circulates hot air throughout the oven cavity. This is the closest your standard oven gets to an air fryer’s mechanism.
### Activating the Convection Mode
Most modern ovens, whether electric or gas, offer a convection setting. It might be labeled as “Convection Bake,” “Convection Roast,” or simply “Convection.”
1. Locate the Setting: Consult your oven’s manual if you’re unsure. The setting is usually found on your oven’s control panel, often as a mode selection or a dedicated button.
2. Select the Right Convection Mode:
* Convection Bake: This is generally used for baking pastries, cookies, and cakes. The fan runs, but the heating elements cycle on and off more frequently. For air frying conversion, this might be too gentle.
* Convection Roast: This mode is usually more intense, with the fan running more consistently and the heating elements staying on longer. This is often the best choice for achieving that “air-fried” crispiness. Some ovens have a specific “Air Fry” setting that utilizes this intense convection.
* True Convection/European Convection: If your oven has a third heating element (often in the back, around the fan), this is ideal. It provides the most even heat and best air circulation.
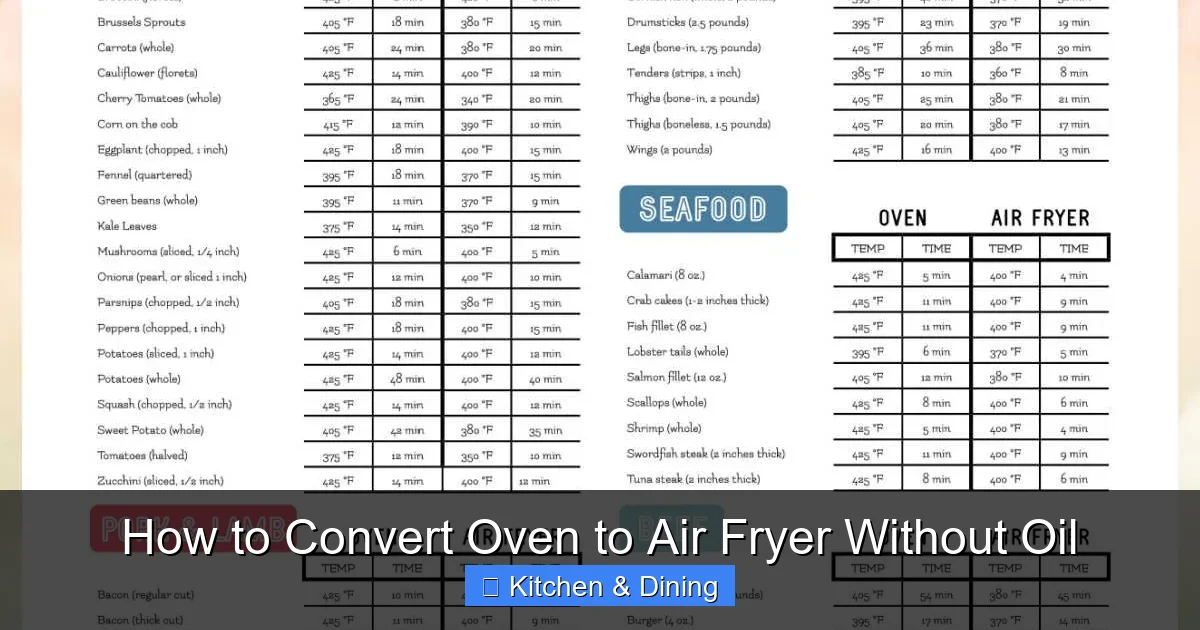
### Understanding Temperature and Time Differences with Convection
When using your oven’s convection setting, you’ll generally need to adjust your recipe’s temperature and cooking time. The circulating hot air cooks food faster and more efficiently.
* Reduce Temperature: A common rule of thumb is to reduce the recipe’s temperature by 25°F (about 15°C). So, if a recipe calls for 400°F (200°C), try setting your convection oven to 375°F (185°C).
* Reduce Time: Cooking times may be reduced by 10-25%. Start checking your food for doneness earlier than the recipe suggests.
Even if your oven doesn’t have a dedicated “Air Fry” setting, using the convection roast or a high-heat convection bake mode will get you close.
## Maximizing Airflow: The Secret to Oven “Air Frying”
Since your oven is larger than an air fryer, you need to be more strategic about ensuring hot air can circulate freely around your food. This is the most critical step in achieving that oil-free crisp.
### Choosing the Right Bakeware
The type of pan you use can significantly impact airflow.
1. Perforated Pans: These are your best friends for oven “air frying.” Look for baking sheets or pans with small holes. These holes allow air to circulate underneath and around your food, preventing the bottom from becoming soggy and promoting even crisping. Many pizza pans are perforated and work wonderfully.
2. Wire Racks: Placing food directly on a wire rack set inside a baking sheet is an excellent way to allow air to flow freely from all sides. You can elevate your food this way.
3. Avoid Solid, Deep Pans: While great for roasting, solid pans that fully enclose your food can trap moisture and hinder the crispy results you’re looking for. If you must use a solid pan, ensure the food is spread out and not crowded.
### Strategic Food Placement
How you arrange your food on the baking surface is crucial.
1. Single Layer: Never overcrowd your baking sheet. Food should be in a single layer with space between each piece. This allows hot air to reach all surfaces. If you’re cooking a large batch, you may need to cook in multiple rounds.
2. Rack Position: For most oven “air frying,” the middle rack position is ideal. This ensures the food is roughly equidistant from the top and bottom heating elements (if applicable) and allows for good airflow. If your oven has a powerful top broiler, you might experiment with the second-highest rack for extra browning, but watch it closely.
3. Elevate Your Food: As mentioned, using a wire rack placed inside a baking sheet is a fantastic method. This creates space underneath for air to circulate. For smaller items like fries or bite-sized vegetables, a perforated pan placed directly on the oven rack is often sufficient.
## The “No Oil” Advantage and How to Achieve It
The primary goal here is to achieve that desirable crispy texture without adding oil. This is possible because the high heat and circulating air are doing the work of crisping.
### Understanding Moisture is the Enemy of Crisp
Grease and oil in traditional frying help create a barrier that gets hot and crisps food. Without oil, we rely on the rapid evaporation of moisture from the food’s surface.
* Pat Food Dry: Before seasoning and cooking, always pat your food thoroughly dry with paper towels. Excess surface moisture will steam the food instead of allowing it to crisp.
* Seasoning: Dry rubs or light coatings of cornstarch or flour can help absorb moisture and create a crispier exterior. Don’t overdo it, as too much coating can become gummy.
* Don’t Cover: Never cover your food while attempting to “air fry” in the oven. The cover will trap steam and moisture.
### Achieving Browning Without Oil
When you’re not using oil, you might wonder how to get that appealing golden-brown color.
* High Heat: Ensure your oven is preheated to the correct, high temperature.
* Convection Fan: The constant circulation of hot air will naturally brown the food.
* Flipping or Tossing: For maximum crispiness on all sides, especially for items like fries or chicken pieces, you’ll likely need to flip them halfway through the cooking time. This ensures each surface gets exposed to the hot, circulating air. For smaller items, giving the pan a good shake can also help.
## Step-by-Step: Converting Oven to Air Fryer Without Oil
Now, let’s put it all together. Here’s a practical, step-by-step approach.
### Step 1: Preheat Your Oven and Select the Right Settings
1. Preheat: Set your oven to its highest convection setting (Convection Roast or a dedicated Air Fry setting if available) and a temperature of around 400-425°F (200-220°C). This high heat is crucial for crisping.
2. Allow Full Preheat: Let your oven preheat for at least 15-20 minutes to ensure it reaches and maintains the target temperature.
### Step 2: Prepare Your Food
1. Wash and Dry: If using fresh produce, wash it and then pat it *very* dry with paper towels. For proteins like chicken wings or fries, ensure they are as dry as possible.
2. Season: Toss your food with your desired dry seasonings. A light dusting of salt, pepper, garlic powder, or paprika works well. For an extra crisp, consider a very light coating of cornstarch or arrowroot powder.
3. Avoid Wet Marinades: If you’re marinating, try to drain off as much liquid as possible before cooking, or opt for dry rubs for this method.
### Step 3: Arrange Food for Optimal Airflow
1. Choose Your Pan: Select a perforated baking sheet, a pizza pan, or a standard baking sheet fitted with a wire rack.
2. Single Layer: Arrange your seasoned food in a single layer on your chosen pan or rack. Ensure there is space between each piece. Do not overcrowd.
3. Rack Position: Place the pan on the middle rack of your preheated oven.
### Step 4: Cook and Monitor
1. Initial Cook Time: Start with a shorter cooking time than you might expect, as convection cooking is faster. For example, if you’re making fries that might take 20 minutes in an air fryer, start by checking after 10-12 minutes.
2. Flip or Toss: About halfway through the estimated cooking time, carefully open the oven and flip your food with tongs or a spatula. For smaller items like fries, you can also give the pan a good shake to redistribute them. This ensures even browning and crisping.
3. Monitor Closely: Watch your food vigilantly. Oven temperatures can vary, and high heat can lead to burning quickly. Look for the desired golden-brown color and crispy texture.
4. Adjust as Needed: If one side is browning faster, you can rotate the pan. If food is getting too dark before it’s crispy, you can slightly lower the temperature and continue cooking.
### Step 5: Serve and Enjoy
Once your food is perfectly crispy and cooked through, carefully remove it from the oven. Serve immediately and savor your healthy, oil-free “air-fried” creations!
## Practical Tips for Success
* Know Your Oven: Every oven is different. Pay attention to how your oven heats and cooks. You might find you prefer a slightly lower temperature or a different rack position after a few tries.
* Smaller Pieces Cook Faster: Like with a real air fryer, smaller or thinner pieces of food will cook and crisp up much faster than larger, thicker ones. Cut vegetables into uniform sizes for even cooking.
* Roasting Vegetables: This method is fantastic for vegetables like broccoli, cauliflower, Brussels sprouts, potatoes, and bell peppers. They get wonderfully tender on the inside and crispy on the outside.
* Chicken Wings: For crispy chicken wings, ensure they are patted extremely dry. A little cornstarch in the seasoning can go a long way.
* Frozen Foods: Many frozen “air fryer” or “oven-ready” items can be cooked using these techniques. Follow the package directions for temperature, but adjust for convection and consider the airflow principles.
* Baking Cookies: While not strictly “air frying,” using convection at a slightly lower temperature can produce wonderfully crisp cookies. You might even consider it for items that benefit from crisp edges.
* Consider a Dedicated Air Fryer Oven: If you find yourself frequently wishing for air fryer capabilities, and your current oven doesn’t quite cut it, you might explore ovens with built-in air fry features. Some of the {{best wall oven microwave combo with air fryer}} models offer this convenience. Similarly, a {{best microwave convection oven combo countertop}} can also provide air frying functions.
## Troubleshooting Common Issues
* Food is soggy, not crispy:
* Cause: Not enough airflow, overcrowding, food too wet, oven not hot enough.
* Solution: Ensure food is in a single layer, use a perforated pan or rack, pat food very dry, ensure the oven is fully preheated to a high temperature.
* Food is burning on the outside, but not cooked inside:
* Cause: Oven temperature too high, or food pieces are too small/thin.
* Solution: Reduce oven temperature by 25°F (15°C), check food more frequently, ensure pieces are a consistent size.
* Uneven cooking or browning:
* Cause: Poor air circulation, overcrowding, or oven hot spots.
* Solution: Ensure food is not overcrowded, flip or toss food halfway through, rotate the pan halfway through, try a different rack position if your oven has known hot spots.
## Conclusion
Converting your standard oven into an “air fryer” without oil is entirely achievable with a few smart adjustments to your cooking techniques. By leveraging your oven’s convection setting, maximizing airflow with the right bakeware and food placement, and understanding the principles of moisture removal and high-heat circulation, you can achieve deliciously crispy results. Embrace these methods to enjoy healthier, guilt-free versions of your favorite “fried” foods, all from the convenience of your own kitchen. Happy cooking!
Key Takeaways
- Convection is Key: Utilize your oven’s convection setting, which mimics the circulating hot air of an air fryer for crispier results.
- Rack Placement Matters: Position your oven rack strategically to allow for optimal air circulation around your food.
- Temperature and Time Adjustments: Learn how to adjust cooking temperatures and times when converting recipes from air fryer to oven.
- The Role of Airflow: Understand that maximizing airflow around the food is crucial for achieving that signature air-fried crispiness.
- No Oil Needed (for crisping): The techniques focus on circulating hot air, negating the need for added oil to achieve a fried texture.
- Versatility of Techniques: These methods can be applied to a wide variety of foods, from vegetables to proteins.